Alex noted that the HP Velotechnik boys are very good at designing bikes and not nearly so good at writing instructions, and I agree. I have the instruction manual for the bike and for the fork it provides no diagrams and no real clue as to what might need to be adjusted, and why. It goes so far as to say:
The adjustment of the fork play requires special tools and skills. Please have your bicycle mechanic perform this maintenance work. The following section refers to the expert.
Many years ago, I was a paid bicycle mechanic. I also have an engineering masters, and I still found the instructions difficult. I have therefore created some illustrations [1], so that one might have a better idea of what lies within before doing any unbolting of things.
There are three main issues you might have with the fork: it can squeak for unknown reasons (as did Alex's, and Dave Larrington's), the movement can become stiff and reluctant, and it can start to wobble as might happen with a loose headset. Mine was wobbling a little, enough to be disconcerting when powering uphill with the front of the bike moving around.
How does the fork work? How does it adjust?
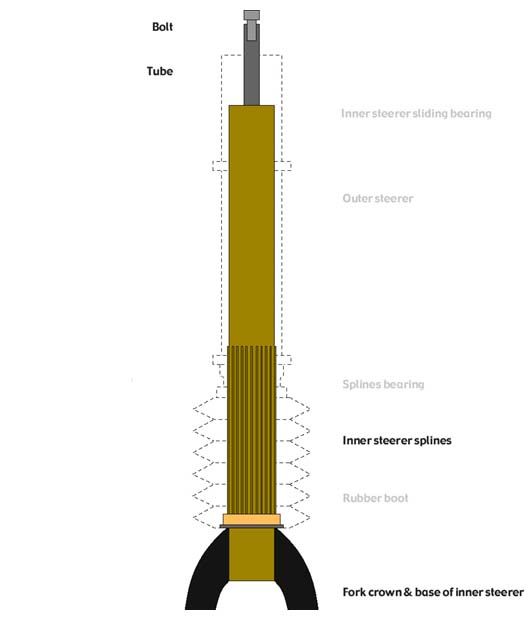
The fork is essentially very simple, but made slightly more complicated by having externally adjustable damping. The fork itself has a long steerer and it slides up and down within a larger tube. Sandwiched between the two tubes are a plastic sliding bearing at the bottom and a teflon [2] sliding bearing at the top. The larger tube rotates inside the two headset bearings, and protrudes at the top where the handlebar stem is attached. So that you can actually steer, the steerer tube has a set of splines which engage with the inside of the plastic bearing, and the plastic bearing is splined to fit inside the end of the larger tube. This way everything turns together.
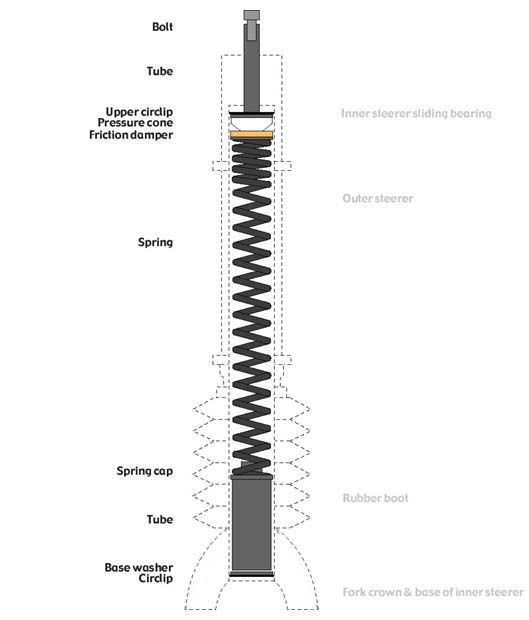
Friction damping is provided by two flat doughnut-shaped pieces of foam. The larger one is sandwiched between the two tubes, and the smaller is pressed against the inside of the steerer tube. The damping is made adjustable by the black control cap at the very top of the larger tube; as you tighten the cap down, it compresses the larger piece of foam.
The coil spring in the fork sits inside the steerer tube. At the bottom end it sits on a tube and is retained by a washer and a large circlip, and at the top by the base of a small tube which is connected directly to the black cap. As the fork compresses over a bump, the steerer tube slides upwards through the larger tube, and the spring is compressed because the black cap stops it moving upwards and the circlip stops it moving downwards out of the fork. The small tube ends in a flat section where the spring butts up against, and when the fork is at maximum extension, the flat section butts up against a circlip at the top of the inner steerer. Got all that?
If you need to adjust the fork, you can (in theory) do it without removing it from the frame. I couldn't tell what I was really adjusting when I was trying to adjust-out the slight wobble, so I removed the fork from the frame and took it completely apart to find out. Once you've removed the stem and the front brake, the fork can be tapped out of the frame by using a soft mallet on the top of the steerer. Mine was quite tight the first time.
Once you've hammered the fork out of the frame, have a think through the X-ray view here and the following pictures. You won't be able to take the fork apart further unless you remove the spring first so that you can slide the inner steerer into the outer to access the small tube. And you won't be able to hammer the fork back into the frame properly unless you remove the spring first, because the suspension will do its job of absorbing shocks, and do it rather well. So for disassembly, the first thing you should do is remove the spring, and this can be done whether the fork is still mounted in the frame or not. There is a slight preload on the spring: a couple of millimeters, according to the book, so be careful when you remove the circlip from the fork crown. This isn't the time for bodgery, you'll want proper internal circlip pliers.
What's inside, and taking things apart
With the fork removed from the frame, it'll look like this:
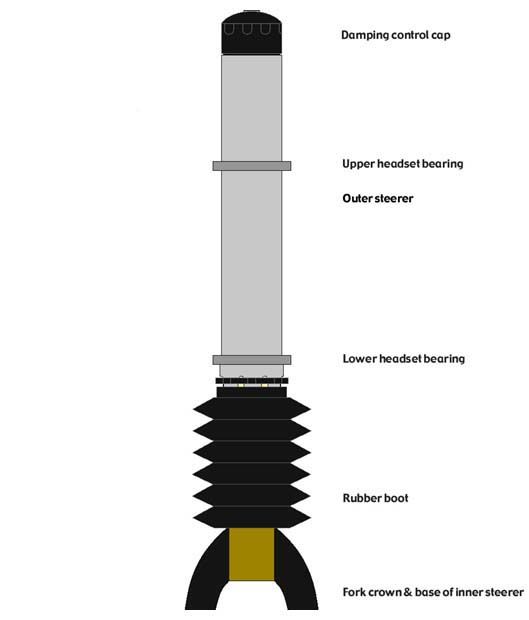
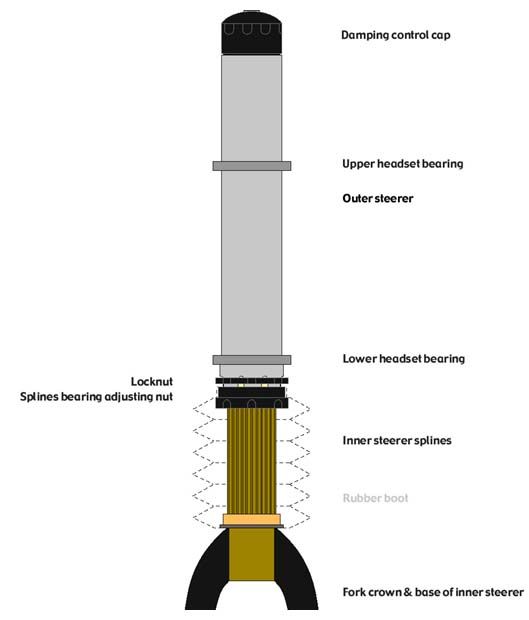
Peel the rubber boot down from the top and you should see the splines, the locknut, and the adjusting nut which bears directly on the bottom edge of the plastic sliding bearing:
For reference, here are the components which are sandwiched between the inner and outer steerer tubes:
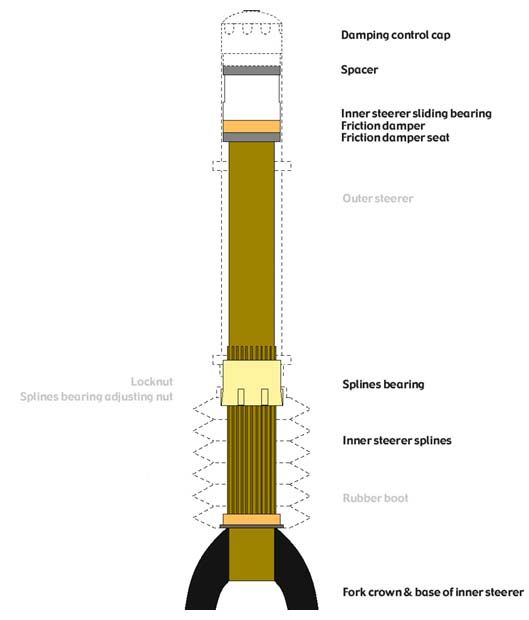
You can see that if the outer steerer is held tightly in its big bearings, the inner steerer can wobble if either or both of the plastic splines bearing or the teflon upper sliding bearing are worn. The lower bearing is slightly tapered externally, and by turning the adjusting nut to force the bearing upwards into the outer steerer tube, it contracts fractionally onto the splines of the inner steerer, thus taking up any wear. The locknut is then snugged down onto the adjusting nut. I found it impossible to make this adjustment with the fork still in the frame, and very difficult to make the adjustment even when I could see everything. One might use a very time-consuming trial-and-error approach by adjusting the bearing pressure, reassembling the fork in the frame and checking for movement. I set the nut pressure just short of when the inner steerer became stiff to slide up and down inside the plastic bearing. Personally, I think Cannondale's Headshok needle bearing approach might take out some of this guesswork. I used Park Tool's HCW-5 lockring spanner.
That all said, the inner and outer steerers won't come apart until you unscrew the damping control cap from the outer steerer and you then unscrew the top bolt from the small tube that will be visible having unscrewed the cap. You'll need pliers on the small tube to hold it. The cap will then be free and you can slide the outer steerer up and off the inner:
Ok, not much to see there, but that's the inner steerer exposed. It will be a bit greasy and any grit that gets into the splines won't do them any good. Without the spring in place, the small tube can drop out of the bottom of the inner steerer and you'll find attached to it a chamfered teflon piece [2,3] and the second foam doughnut. Here is what's inside the inner steerer before anything is taken apart:
Reassembly
In true Haynes manual fashion, installation is the reverse of removal. More or less. With the spring out of the fork, reassemble the inner and outer steerers with their components, and with the outer steerer in place, check the plastic sliding bearing for the correct tightness. If it's ok, hold the small tube with the pliers and reattach the damping control cap and screw it a few turns into the outer steerer. Remember that it is one of several components that takes the full load of the suspension, so screw it back in until all the thread is hidden. There will still be a few turns of adjustment available and you may not need it screwed all the way in. Slide the fork assembly back into the frame and it'll wobble around until the lower bearing begins to seat itself. You will then need a drift such as a 1/2 inch diameter pipe, 18 inches long or so. I used a piece of lawnmower handle. Put the drift up inside the inner steer and carefully, but firmly, hammer the fork back into the frame. It'll go in anything from 1/4 inch to 1/2 inch more, and you can tell when it's fully seated as the sound of the hammer hitting the drift will raise in pitch and the blows will suddenly feel solid.
You can then put the spring, the spring cap, the tube, the washer and the circlip back into the bottom of the fork. You might want to use the drift again to preload the spring while you put the circlip in place. With the wheel in the fork and the bike on the ground again (you were using a workstand, weren't you?) you can press on the frame to make sure the fork is seated, and snug the stem as far onto the steerer as it'll go. The upper headset bearing cover should be vaguely stiff to turn. This is my main criticism of HP Velotechnik's design; the whole assembly is largely the same as any Aheadset setup, but without the starfangled nut by which you apply the correct preload before clamping the stem. No starfangled nut, no preload - other than pushing on the frame. With the fork in place, bounce the bike a few times and re-check the movement. If it still wobbles, for example, I recommend jumping up and down and swearing, before taking it all apart again. You might get away with knocking the fork halfway out of the frame, until the bearing locknut is visible, but on my bike the bearings were already out of their seats at that point, and the fork wobbled in the frame.
Where did that bit go again?
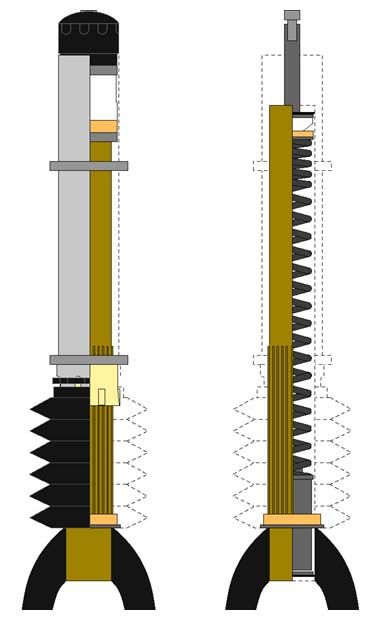
For comparison purposes (and just because I was on a roll with Adobe Illustrator that day) here are two cutaway views of the fork:
[1] I made some sketches as I disassembled things. I only made one measurement, so the illustrations aren't completely to scale. They're near enough, though.
[2] Well, I'd like to think it's teflon. It might actually be Nylon 66 or something.
[3] I didn't sketch everything, however. Some of the internal components such as the pressure cone I drew from memory and so might not be quite right. I didn't take everything apart again, just to check.